Advanced Topics
The following discussions cover details of PyInstaller internal methods. You should not need this level of detail for normal use, but such details are helpful if you want to investigate the PyInstaller code and possibly contribute to it, as described in How to Contribute.
The Bootstrap Process in Detail
There are many steps that must take place before the bundled script can begin execution. A summary of these steps was given in the Overview (How the One-Folder Program Works and How the One-File Program Works). Here is more detail to help you understand what the bootloader does and how to figure out problems.
Bootloader
The bootloader prepares everything for running Python code. It begins the setup and then returns itself in another process. This approach of using two processes allows a lot of flexibility and is used in all bundles except one-folder mode in Windows. So do not be surprised if you will see your bundled app as two processes in your system task manager.
What happens during execution of bootloader:
First process: bootloader starts.
If one-file mode, extract bundled files to
temppath/_MEIxxxxxx.Modify various environment variables:
GNU/Linux: If set, save the original value of LD_LIBRARY_PATH into LD_LIBRARY_PATH_ORIG. Prepend our path to LD_LIBRARY_PATH.
AIX: same thing, but using LIBPATH and LIBPATH_ORIG.
macOS: unset DYLD_LIBRARY_PATH.
Set up to handle signals for both processes.
Run the child process.
Wait for the child process to finish.
If one-file mode, delete
temppath/_MEIxxxxxx.
Second process: bootloader itself started as a child process.
On Windows set the activation context.
Load the Python dynamic library. The name of the dynamic library is embedded in the executable file.
Initialize Python interpreter: set sys.path, sys.prefix, sys.executable.
Run python code.
Running Python code requires several steps:
Run the Python initialization code which prepares everything for running the user’s main script. The initialization code can use only the Python built-in modules because the general import mechanism is not yet available. It sets up the Python import mechanism to load modules only from archives embedded in the executable. It also adds the attributes
frozenand_MEIPASSto thesysbuilt-in module.Execute any run-time hooks: first those specified by the user, then any standard ones.
Install python “egg” files. When a module is part of a zip file (.egg), it has been bundled into the
./eggsdirectory. Installing means appending .egg file names tosys.path. Python automatically detects whether an item insys.pathis a zip file or a directory.Run the main script.
Python imports in a bundled app
PyInstaller embeds compiled python code
(.pyc files) within the executable.
PyInstaller injects its code into the
normal Python import mechanism.
Python allows this;
the support is described in PEP 302 “New Import Hooks”.
PyInstaller implements the PEP 302 specification for
importing built-in modules,
importing “frozen” modules (compiled python code
bundled with the app) and for C-extensions.
The code can be read in ./PyInstaller/loader/pyi_mod03_importers.py.
At runtime the PyInstaller PEP 302 hooks are appended
to the variable sys.meta_path.
When trying to import modules the interpreter will
first try PEP 302 hooks in sys.meta_path
before searching in sys.path.
As a result, the Python interpreter
loads imported python modules from the archive embedded
in the bundled executable.
This is the resolution order of import statements in a bundled app:
Is it a built-in module? A list of built-in modules is in variable
sys.builtin_module_names.Is it a module embedded in the executable? Then load it from embedded archive.
Is it a C-extension? The app will try to find a file with name
package.subpackage.module.pydorpackage.subpackage.module.so.Next examine paths in the
sys.path. There could be any additional location with python modules or.eggfilenames.If the module was not found then raise
ImportError.
Splash screen startup
Note
This feature is incompatible with macOS. In the current design, the splash screen operates in a secondary thread, which is disallowed by the Tcl/Tk (or rather, the underlying GUI toolkit) on macOS.
If a splash screen is enabled, the bootloader’s startup procedure and threading model is a little more complex. The following describes the order of operation if splash screen is enabled:
Bootloader checks if it needs to display splash screen, i.e., if it is running in onedir mode or as a parent process in onefile mode.
If running in onefile mode, extract the splash screen dependencies (Tcl/Tk shared libraries and resources). The files are extracted to the application’s temporary directory (
temppath/_MEIxxxxxx).Tcl and Tk shared libraries are loaded into the booloader, and required Tcl/Tk symbols are bound.
Windows:
tcl86t.dll/tk86t.dllLinux:
libtcl.so/libtk.so
Prepare a minimal environment for the Tcl/Tk interpreter by replacing/modifying the following functions:
::tclInit: This command is called to find the standard library of Tcl. We replace this command to force Tcl to load/execute only the bundled modules.::tcl_findLibrary: Tk uses this function to source all its components. The overwritten function sets the required environment variable and evaluates the requested file.::exit: This function is modified to ensure a proper exit of the splash screen thread.::source: This command executes the contents of a passed file. Since we run in a minimal environment we mock the execution of not bundled files and execute those who are.
Start the Tcl interpreter and execute the splash screen script, which was generated by PyInstaller’s build target
Splashat build time. This script creates the environment variable_PYI_SPLASH_IPC, which is also available to the python interpreter. It also initializes a TCP server socket to receive commands from python.
Note
The Tcl interpreter is started in a separate thread. Only after the Tcl interpreter has executed the splash screen script, the bootloader thread, which is responsible for extraction/starting the python interpreter, is resumed.
Environment Variables Used by Frozen Applications
At run-time, PyInstaller’s bootloader uses several environment variables. Broadly speaking, these can be grouped into two categories: public environment variables that allow user or application developer to alter the behavior of the frozen application, and private environment variables, which are used internally by the bootloader for inter-process communication (for example, so that onefile parent process can communicate the location of the temporary directory with extracted files to the child process).
Note
PyInstaller-frozen applications use isolated instances of embedded python interpreter, and as such, do not process environment variables used by python interpreter. Some of these options can be (permanently) set at build time; see Specifying Python Interpreter Options.
Public environment variables
Public environment variables have PYINSTALLER_ prefix. Currently,
the following variables are used:
- PYINSTALLER_SUPPRESS_SPLASH_SCREEN
Setting this environment variable to 1 allows user to suppress splash screen in a splash-screen enabled application. This causes splash screen not to be shown, and functions of
pyi_splashmodule become no-op without raising errors or warnings.
- PYINSTALLER_SPLASH_SCREEN_CENTER
Setting this environment variable allows user to override the splash screen centering mode at run-time. Valid values are:
default,primary,virtual,active.
- PYINSTALLER_RESET_ENVIRONMENT
Setting this environment variable to 1 causes the bootloader to reset all PyInstaller’s internal environment variables, thus causing its process to be treated as a top-level process of a new instance of the application. In onefile mode, for example, this forces the application to unpack itself again.
This environment variable is primarily intended for application developers that want to spawn subprocesses that outlive the current application process, for example, to implement application restart.
- PYINSTALLER_STRICT_UNPACK_MODE
This environment variable being set to a value different than 0 turns on strict unpack mode for onefile applications. This turns file duplication issues and the failure to clean up the temporary files into fatal errors instead of warnings.
This is primarily intended for use in PyInstaller’s CI pipelines to automatically catch the afore-mentioned issues.
In onefile builds, the temporary directory location is also determined by (system-wide) environment variable(s). See Defining the Extraction Location for OS-specific details.
Private environment variables
Private environment variables have _PYI_ prefix. They are used
internally by bootloader, primarily for communicating the settings and
the state between processes - the parent process (onefile), the main
application process, and any worker processes spawned via sys.executable.
These environment variables should not be modified outside of the bootloader code, as incorrect modification may break the frozen application (for example, result in endless process spawn loop).
- _PYI_ARCHIVE_FILE
Used to track the path to the archive file used by parent PyInstaller process (if any) and comparing it to the archive file of the current process, to determine if the executable has changed.
If the environment variable is not set or if the path to archive file has changed, the current process is treated as a top-level process of the new instance of a PyInstaller-frozen application (i.e., all private environment variables are reset). This allows handling of scenarios when a onefile frozen application runs a different onefile frozen application in a subprocess; this second application must be started as a new instance of application (i.e., it needs to unpack itself into new temporary directory).
- _PYI_PARENT_PROCESS_LEVEL
Used to track the process level, i.e., distinguish between the parent process (in onefile application), the main application process, and potential worker processes spawned via
sys.executable.If the environment variable is not defined, the process is considered to be a top-level process, i.e., a parent process of a onefile application, or main application process of a onedir application process. This process then sets the environment variable to inform the child process of its type, i.e., main application process of a onefile application or a worker sub-process of a onedir application. In case of onefile application, the main application process again modifies the environment variable to inform its child processes of their type, i.e., worker sub-processes.
- _PYI_LINUX_PROCESS_NAME
Used to copy the name of the top-level onefile process (the parent process) to child processes, via the
prctlsyscall withPR_GET_NAMEandPR_SET_NAME.
- _PYI_APPLICATION_HOME_DIR
Used by the top-level onefile process (the parent process) to communicate the location of the application’s temporary directory to the main application process. The main application process copies this path to the PyInstaller-specific
sys._MEIPASSattribute.
- _PYI_SPLASH_IPC
Set by splash-screen enabled application to to communicate the splash screen’s IPC port to the
pyi_splashmodule.The environment variable is set by the splash screen’s Tcl script, which runs in auxiliary thread of a onefile application’s parent process or onedir application’s main application process. It is read by the
pyi_splashmodule, which typically runs in the main application process.For worker processes spawned via
sys.executable, the value is set to 0, which signals topyi_splashthat splash screen is suppressed in this particular (sub)process. Similarly, the bootloader sets the value of this environment variable to 0 if splash screen is suppressed via the publicPYINSTALLER_SUPPRESS_SPLASH_SCREENenvironment variable.
pyi_splash Module (Detailed)
This module connects to the bootloader to send messages to the splash screen.
It is intended to act as an RPC interface for the functions provided by the bootloader, such as displaying text or closing. This makes the users python program independent of how the communication with the bootloader is implemented, since a consistent API is provided.
To connect to the bootloader, it connects to a local tcp server socket whose port
is passed through the environment variable _PYI_SPLASH_IPC. The bootloader
connects to the socket via the python module _socket. Although this socket
is bidirectional, the module is only configured to send data.
Since the os-module, which is needed to request the environment variable,
is not available at boot time, the module does not establish the connection
until initialization.
This module does not support reloads while the splash screen is displayed, i.e.
it cannot be reloaded (such as by importlib.reload()), because the splash
screen closes automatically when the connection to this instance of the
module is lost.
Note
The splash screen might be gracefully disabled in some types of processes
(for example, worker sub-processes spawned by the main application process).
In addition, user can explicitly request splash screen to be suppressed
at run-time by setting the PYINSTALLER_SUPPRESS_SPLASH_SCREEN environment
variable to 1. In such cases, the pyi_splash module can still be
imported but its functions are all no-op.
Functions
Note
Note that if the _PYI_SPLASH_IPC environment variable does not exist or an
error occurs during the connection, the module will not raise an error, but simply
not initialize itself (i.e. pyi_splash.is_alive() will return False). Before
sending commands to the splash screen, one should check if the module was initialized
correctly, otherwise a RuntimeError will be raised.
- is_alive()
Indicates whether the module can be used.
Returns
Falseif the module is either not initialized or was disabled by closing the splash screen. Otherwise, the module should be usable.
- update_text(msg)
Updates the text on the splash screen window.
- Parameters:
msg (str) – the text to be displayed
- Raises:
ConnectionError – If the OS fails to write to the socket
RuntimeError – If the module is not initialized
- close()
Close the connection to the ipc tcp server socket
This will close the splash screen and renders this module unusable. After this function is called, no connection can be opened to the splash screen again and all functions if this module become unusable
The Table of Contents (TOC) lists and the Tree Class
PyInstaller manages lists of files that are to be collected in the so-called Table of Contents (TOC) list format. These lists contain three-element tuples that encapsulate information about a file’s destination name, the file’s full source path, and its type.
As part of utilities for managing the TOC lists, PyInstaller provides
a Tree class as a convenient way to build a TOC list from the
contents of the given directory. This utility class can be used either
in the .spec files file or from custom hooks.
Table of Contents (TOC) lists
The Analysis object produces several TOC lists that provide information
about files to be collected. The files are grouped into distinct lists
based on their type or function, for example:
- Analysis.scripts: program script(s)
- Analysis.pure: pure-python modules
- Analysis.binaries: binary extension modules and shared libraries
- Analysis.datas: data files
The generated TOC lists are passed to various build targets within the
spec file, such as PYZ, EXE, and
COLLECT.
Each TOC list contains three-element tuples,
(dest_name, src_name , typecode)
where dest_name is the destination file name (i.e., file name within
the frozen application; as such, it must always be a relative name),
src_name is the source file name (the path from where the file is
collected), and typecode is a string that denotes the type of the
file (or entry).
Internally, PyInstaller uses a number of typecode values, but for the normal case you need to know only these:
typecode |
description |
dest_name |
src_name |
|---|---|---|---|
‘DATA’ |
Arbitrary (data) files. |
Name in the frozen application. |
Full path to the file on the build system. |
‘BINARY’ |
A shared library. |
Name in the frozen application. |
Full path to the file on the build system. |
‘EXTENSION’ |
A Python binary extension. |
Name in the frozen application. |
Full path to the file on the build system. |
‘OPTION’ |
A PyInstaller/Python run-time option. |
Option name (and optional value, separated by a whitespace). |
Ignored. |
The destination name corresponds to the name of the final in the
frozen application, relative to the top-level application directory.
It may include path elements, for example extras/mydata.txt.
Entries of type BINARY and EXTENSION are assumed to represent a
file containing loadable executable code, such as a dynamic library.
Generally, EXTENSION is used to denote Python extensions modules,
such as modules compiled by Cython. The two file types are treated in
the same way; PyInstaller scans them for additional link-time
dependencies and collects any dependencies that are discovered. On some
operating systems, binaries and extensions undergo additional processing
(such as path rewriting for link-time dependencies and code-signing
on macOS).
The TOC lists produced by Analysis can be modified in the
spec file file before they are passed on to
the build targets to either include additional entries (although it is
preferable to pass extra files to be included via binaries or datas
arguments of Analysis) or remove unwanted entries.
Changed in version 5.11: In PyInstaller versions prior to 5.11, the TOC lists were in fact
instances of the TOC class, which internally performed
implicit entry de-duplication; i.e., trying to insert an entry with
existing target name would result in no changes to the list.
However, due to the shortcomings of the TOC class that resulted from
loosely-defined and conflicting semantics, the use of the TOC class
has been deprecated. The TOC lists are now instances of plain list,
and PyInstaller performs explicit list normalization (entry de-duplication).
The explicit normalization is performed at the end of Analysis
instantiation, when the lists are stored in the class’ properties (such
as Analysis.datas and Analysis.binaries). Similarly, explicit
list normalization is also performed once the build targets (EXE,
PYZ, PKG, COLLECT, BUNDLE) consolidate the input TOC
lists into the final list.
The Tree Class
The Tree class offers a convenient way of creating a TOC list that
describes contents of the given directory:
Tree(root, prefix=run-time-folder, excludes=string_list, typecode=code |'DATA' )
The root argument is a string denoting the path to the directory. It may be absolute or relative to the spec file directory.
The optional prefix argument is a name for a sub-directory in the application directory into which files are to be collected. If not specified or set to
None, the files will be collected into the top-level application directory.The optional excludes argument is a list of one or more strings that match files in the root that should be omitted from the Tree. An item in the list can be either:
a name, which causes files or folders with this basename to be excluded
a glob pattern (e.g.,
*.ext), which causes matching files to be excluded
The optional typecode argument specifies the TOC typecode string that is assigned to all entries in the TOC list. The default value is
DATA, which is appropriate for most cases.
For example:
extras_toc = Tree('../src/extras', prefix='extras', excludes=['tmp', '*.pyc'])
This creates extras_toc as a TOC list that contains entries for
all files from the relative path ../src/extras,
omitting those that have the basename (or are in a folder named) tmp
or have the .pyc extension.
Each tuple in this TOC has:
A dest_name in form of:file:extras/{filename}.
A src_name that corresponds to the full absolute path to that file in the
../src/extrasfolder (relative to the location of the spec file).A typecode of
DATA(the default).
An example of creating a TOC listing some binary modules:
cython_mods = Tree('..src/cy_mods', excludes=['*.pyx', '*.py', '*.pyc'], typecode='EXTENSION')
This creates a TOC list with entries for each file in the cy_mods directory,
excluding files with the .pyx, .py, or .pyc extension
(so presumably collecting only the .pyd or .so modules created by Cython).
Each tuple in this TOC has:
A dest_name that corresponds to the file’s basename (all files are collected in top-level application directory).
A src_name that corresponds to the full absolute path to that file in
../src/cy_modsrelative to the spec file.A typecode of
EXTENSION(BINARYcould be used as well).
Inspecting Archives
An archive is a file that contains other files,
for example a .tar file, a .jar file, or a .zip file.
Two kinds of archives are used in PyInstaller.
One is a ZlibArchive, which
allows Python modules to be stored efficiently and,
with some import hooks, imported directly.
The other, a CArchive, is similar to a .zip file,
a general way of packing up (and optionally compressing) arbitrary blobs of data.
It gets its name from the fact that it can be manipulated easily from C
as well as from Python.
Both of these derive from a common base class, making it fairly easy to
create new kinds of archives.
ZlibArchive
A ZlibArchive contains compressed .pyc or .pyo files.
The PYZ class invocation in a spec file creates a ZlibArchive.
The table of contents in a ZlibArchive
is a Python dictionary that associates a key,
which is a member’s name as given in an import statement,
with a seek position and a length in the ZlibArchive.
All parts of a ZlibArchive are stored in the
marshalled format and so are platform-independent.
A ZlibArchive is used at run-time to import bundled python modules.
Even with maximum compression this works faster than the normal import.
Instead of searching sys.path, there’s a lookup in the dictionary.
There are no directory operations and no
file to open (the file is already open).
There’s just a seek, a read and a decompress.
A Python error trace will point to the source file from which the archive
entry was created (the __file__ attribute from the time the
.pyc was compiled, captured and saved in the archive).
This will not tell your user anything useful,
but if they send you a Python error trace,
you can make sense of it.
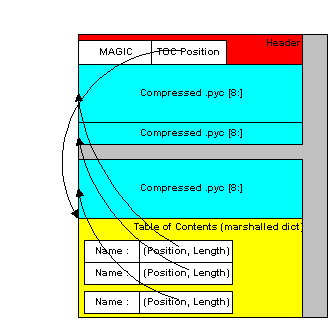
Structure of the ZlibArchive
CArchive
A CArchive can contain any kind of file.
It’s very much like a .zip file.
They are easy to create in Python and easy to unpack from C code.
A CArchive can be appended to another file, such as
an ELF and COFF executable.
To allow this, the archive is made with its table of contents at the
end of the file, followed only by a cookie that tells where the
table of contents starts and
where the archive itself starts.
A CArchive can be embedded within another CArchive. An inner archive can be opened and used in place, without having to extract it.
Each table of contents entry has variable length. The first field in the entry gives the length of the entry. The last field is the name of the corresponding packed file. The name is null terminated. Compression is optional for each member.
There is also a type code associated with each member.
The type codes are used by the self-extracting executables.
If you’re using a CArchive as a .zip file, you don’t need to worry about the code.
The ELF executable format (Windows, GNU/Linux and some others) allows arbitrary data to be concatenated to the end of the executable without disturbing its functionality. For this reason, a CArchive’s Table of Contents is at the end of the archive. The executable can open itself as a binary file, seek to the end and ‘open’ the CArchive.
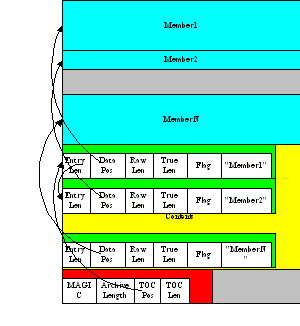
Structure of the CArchive
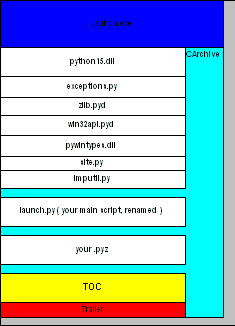
Structure of the Self Extracting Executable
Using pyi-archive_viewer
Use the pyi-archive_viewer command to inspect any type of archive:
pyi-archive_viewerarchivefile
With this command you can examine the contents of any archive built with
PyInstaller (a PYZ or PKG), or any executable (.exe file
or an ELF or COFF binary).
The archive can be navigated using these commands:
- O name
Open the embedded archive name (will prompt if omitted). For example when looking in a one-file executable, you can open the
PYZ-00.pyzarchive inside it.- U
Go up one level (back to viewing the containing archive).
- X name
Extract name (will prompt if omitted). Prompts for an output filename. If none given, the member is extracted to stdout.
- Q
Quit.
The pyi-archive_viewer command has these options:
- -h, --help
Show help.
- -l, --log
Quick contents log.
- -b, --brief
Print a python evaluable list of contents filenames.
- -r, --recursive
Used with -l or -b, applies recursive behaviour.
Inspecting Executables
You can inspect any executable file with pyi-bindepend:
pyi-bindependexecutable_or_dynamic_library
The pyi-bindepend command analyzes the executable or DLL you name
and writes to stdout all its binary dependencies.
This is handy to find out which DLLs are required by
an executable or by another DLL.
pyi-bindepend is used by PyInstaller to
follow the chain of dependencies of binary extensions
during Analysis.
Creating a Reproducible Build
In certain cases it is important that when you build the same application twice, using exactly the same set of dependencies, the two bundles should be exactly, bit-for-bit identical.
That is not the case normally. Python uses a random hash to make dicts and other hashed types, and this affects compiled byte-code as well as PyInstaller internal data structures. As a result, two builds may not produce bit-for-bit identical results even when all the components of the application bundle are the same and the two applications execute in identical ways.
You can ensure that a build will produce the same bits
by setting the PYTHONHASHSEED environment variable to a known
integer value before running PyInstaller.
This forces Python to use the same random hash sequence until
PYTHONHASHSEED is unset or set to 'random'.
For example, execute PyInstaller in a script such as
the following (for GNU/Linux and macOS):
# set seed to a known repeatable integer value
PYTHONHASHSEED=1
export PYTHONHASHSEED
# create one-file build as myscript
pyinstaller myscript.spec
# make checksum
cksum dist/myscript/myscript | awk '{print $1}' > dist/myscript/checksum.txt
# let Python be unpredictable again
unset PYTHONHASHSEED
Changed in version 4.8: The build timestamp in the PE headers of the generated Windows
executables is set to the current time during the assembly process.
A custom timestamp value can be specified via the SOURCE_DATE_EPOCH
environment variable to achieve reproducible builds.